
LED lights do not light up? Common Causes and Solutions
When an LED light suddenly stops working, isn’t your first reaction to just get a new one? But sometimes the problem is not only in the LED light itself. In this article, we will analyze the following causes and solutions for LED failures. After reading this article, you will be equipped with practical tips to be able to solve the problem of LED lights not working by yourself!
LED lights have power but do not light up at all; some LEDs light up while the rest do not; flickering problem causes unstable lighting effect; LEDs still emit weak light even after they are turned off; overheating problem may shorten the service life of LEDs; LED lights have power but do not light up.
Reverse the positive and negative terminals of the LED lamps: Generally speaking, the voltage measured after the reversal is the no-load voltage. If this is the case, simply reconnect the positive and negative poles of the LED lights.
The output wiring is not connected securely: this corresponds to an open circuit in the LED and the measured voltage will show no-load voltage. You will need to reconnect the outputs.
Mismatch between actual load and power output: If the actual power is higher or lower than the rated power, the LED driver circuit may fail.
Short or open circuit: this will cause the LEDs to not light up. In this case, you need to contact a professional to repair the circuit.
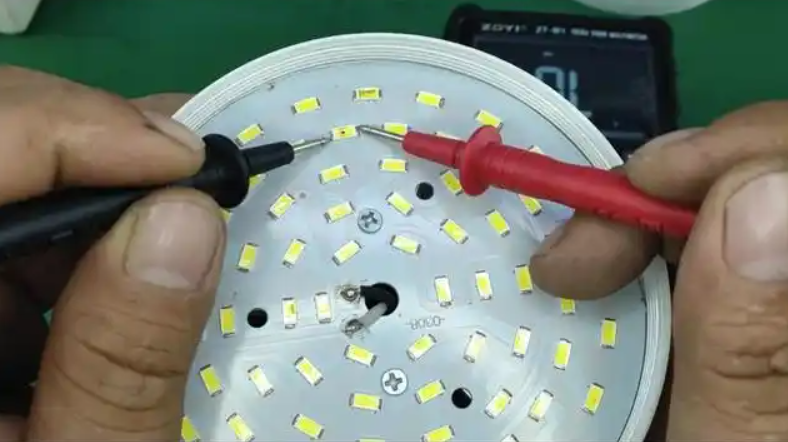
Damaged LED beads: Over time, LED beads can burn out just like any other electronic component. If the problem is not with the power supply or circuitry, check for a damaged bead. One way to do this is to perform a “comparison test” where the suspected faulty bead is compared to a normal one.
Driver or Capacitor Problem: If the driver or capacitor is not compatible with the LEDs, the LEDs will not work properly. Another possibility is a faulty capacitor or LED driver. If the driver fails, its output voltage often cannot meet the required voltage output of the lamp. If the capacitor fails, there may be bulges, electrolyte leakage or burn marks on its surface. In addition, the capacitance value will not be within the rated range. In this case, you should replace the driver or capacitor. When replacing the driver, select a power supply that matches the LEDs. When replacing the capacitor, select a capacitor with the same specifications as the original or a higher withstand voltage value.
Why does only half of my LEDs light up?
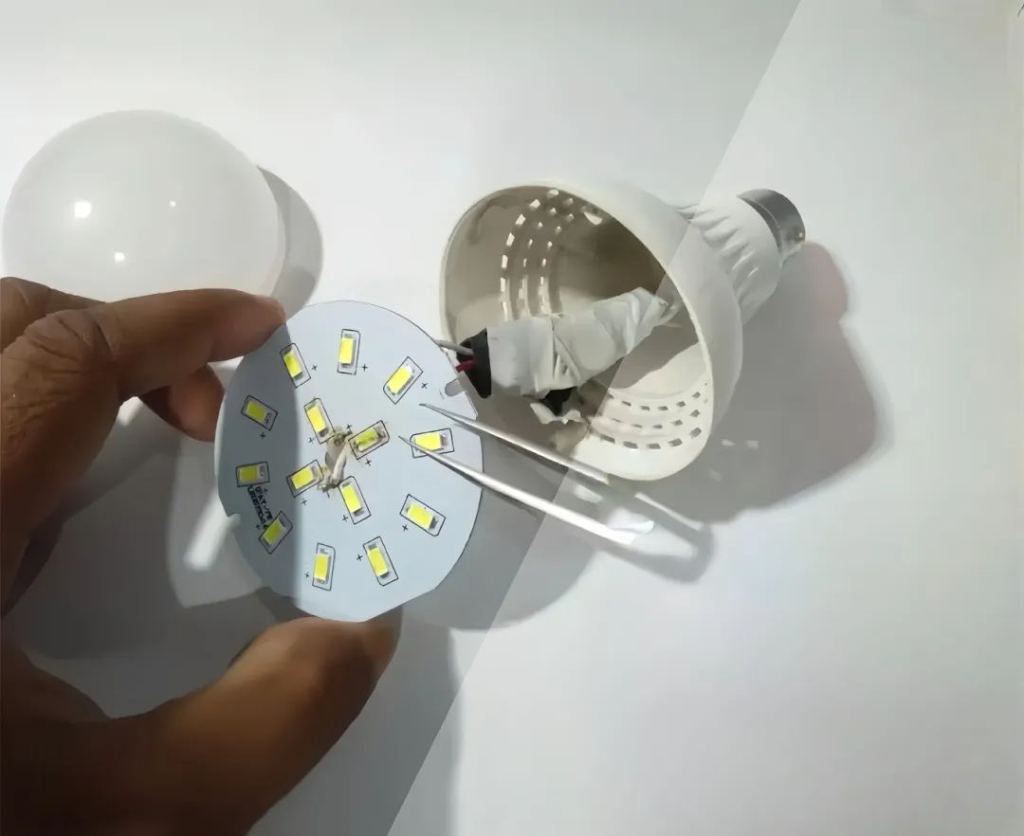
Failure of a single bead in an LED light module will not affect the other beads, but will cause the light to dim. Common causes of lamp bead failure include:
Moisture: Moist LED beads cannot be lit or are not bright enough. This is a common storage problem for LED light beads. Manufacturers usually help customers to bake the beads twice before they are used again.
DAMAGE: Burned out lamp beads will have black spots on the surface. If only one or two lamp beads are damaged, you can order the same type of lamp bead for replacement. If a larger number of lamp beads are damaged, the entire lamp board should be replaced.
LED light strips are usually divided into a number of segments. The light beads in each segment are connected in series, while the segments are connected in parallel. If one of the lamp beads in a segment burns out, it will cause the segment to stop working. In this case, the segment that does not light up can be modified or cut off.
Why are my LEDs blinking?
If the specifications of the LEDs and the driver do not match, the bulb may not be able to withstand the high current, resulting in flickering lights. How to solve the problem of flickering LED lights due to compatibility issues? Replace the lamp with a suitable driver.
LED bulbs can fail after a period of time and the driver may fail. Replacing the driver with a new one may help solve the problem with the LED light.
If the driver has thermal protection, it will protect the circuit when the LEDs are not dissipating heat well. This can cause the lights to flicker. If this is the case, you should improve the fixture’s ability to dissipate heat by modifying the housing, adding cooling components, etc.
LED lights may flicker when used in humid environments. Over time, humid environments can damage the light and the driver. If your driver is waterproof, you can replace the LED bulb.
Dimmer Incompatibility: If you are using a common dimmer, it may be incompatible with the LED lights, causing them to flicker. In this case, you should choose a dimmer designed for LED lights, which usually supports low-power fixtures, won’t interfere with the driver, and has a wide adjustment range.
Voltage fluctuations: LED lights may flicker if they experience frequent voltage changes or if the power supply is unreliable. You can install a voltage regulator or choose a higher quality LED driver.
How to deal with the afterglow phenomenon of LED lights?
The phenomenon of LED light afterglow refers to the fact that the LED light will still emit a weak light after it is turned off.The causes and solutions of LED light afterglow are as follows:
A common cause is a switch that is wired incorrectly. The switch should control the fire wire, not the zero wire. When the switch is turned off, the fixture connected to the fire wire emits a weak light. The solution is to change the wiring so that the switch controls the fire wire.
Some LED lights are manufactured using inexpensive components that can be problematic. For example, some fixtures use poor-quality drivers that may leak, causing the light to flicker or remain lit after being turned off. In addition, copper-clad substrates and capacitive effects can trigger light leakage. You need to buy new fixtures with guaranteed quality.
Some LED lights are equipped with an electronic switch with an indicator light. Even if the switch is turned off, these lights may remain lit because a small amount of current is still flowing through the switch. Replacing the switch or placing a resistor in parallel with the incoming wires to the fixture are two possible solutions.
How to deal with LED light overheating problem?
LED lights can overheat for a number of reasons, including poor design, high temperatures, and other factors. Here are some aspects that you can consider to solve the problem of overheating LED lights:
First, optimize the heat dissipation design. When buying LED lights, you can choose products with superior heat dissipation design, such as those with aluminum alloy heat sinks and large heat dissipation holes. During installation, keep a certain distance between the light and the wall or other objects to help dissipate heat. Heat dissipation design is especially important for outdoor LED lights (such as LED street lights).
Next, control the ambient temperature. When installing LED lights, try to avoid placing them in direct sunlight or hot enclosed spaces. If the temperature is too high, try to use cooling devices such as air conditioners or fans to reduce the temperature.
In addition, regular cleaning of lamps is an effective strategy to reduce heat generation. Dust and dirt on the surface of the fixture reduces the efficiency of heat dissipation, so cleaning the fixture is necessary.
How do I reset the LEDs?
LED strip controllers usually have a reset button on them. After pressing and holding the reset button for 5-10 seconds, the LEDs will start flashing. After resetting, the LED strip will return to its original color. Another reset method is to disconnect the power supply and wait for 10-15 seconds before reconnecting.
For smart LED bulbs, you can reset them on the appropriate app. Since different brands of bulbs may have different reset methods, you should refer to the manual for details.
Frequently Asked Questions
Q: How do I troubleshoot LED lights?
A: When your LED lights don’t work, first check the power connection. Check the bulb for discoloration and possible physical damage. To continue troubleshooting, you can test the bulb by connecting it to another fixture and then purchasing a new bulb to confirm the problem.
Q: How do I know if my LEDs are burned out?
A: When an LED bulb fails, it will either stop glowing altogether or appear to flicker intermittently, and there will be visible burnt areas on the surface. You can also use a multimeter to verify that the LED is maintaining continuous current. If the bulb fails these checks, then it has likely burned out.
Q: Why do LED lights keep failing?
A: Inadequate thermal control of LED lamps can lead to overheating of the system and accelerated aging of the product.LED lamps can fail due to abnormal voltage conditions, installation problems, and manufacturing defects.
結論
In the above article, we have discussed the common faults of LED lights including LED lights not lighting up, flickering, afterglow, and overheating issues. We also mentioned some useful tips for troubleshooting LED lights on your own. However, there are certain operations that you cannot solve and still need to seek professional help.
関連商品


